Part I: Deploying Gatsby to AWS S3
Use GitLab's CI/CD to deploy a Gatsby site to AWS S3
Gatsby is an open-source web framework that lets you build really fast and secure websites. I love because it gives me a lot of control without a lot of complexity. This replaced Wordpress for any of my personal projects.
I've used and deployed Gatsby before using Netlify. It provided a lot of features without a lot of effort such as built-in CI/CD, domain and DNS management, and even automated previews of every commit to your Git repo. The best part: they provide these features on the free tier!
I wanted to replicate some of that here. I will provide a walkthrough of how to deploy your GatsbyJS site to AWS S3 using GitLab CICD pipelines.
Prerequisites
- You have an AWS account. Create an account here
- You have your code hosted on GitLab. Create an account here
- A Gatsby site. If you don't have one already, you can create one quickly from a starter template.
Steps
The walkthrough is didvided into two parts: the AWS and GitLab setup
AWS Setup
- Step 1: Create the S3 bucket
- Step 2: Configure the bucket for static website hosting
- Step 3: Attach new policy
- Step 4: Create new policy for new IAM user
- Step 5: Create IAM User
GitLab Setup
- Step 1: Add CI/CD Variables
- Step 2: Create and configure .gitlab-ci.yml
AWS Setup
Step 1: Create the S3 bucket
Create a new S3 bucket that is publicly accessible.

- Once you are at the S3 console in AWS and click Create bucket
- Name the bucket
- Select a region
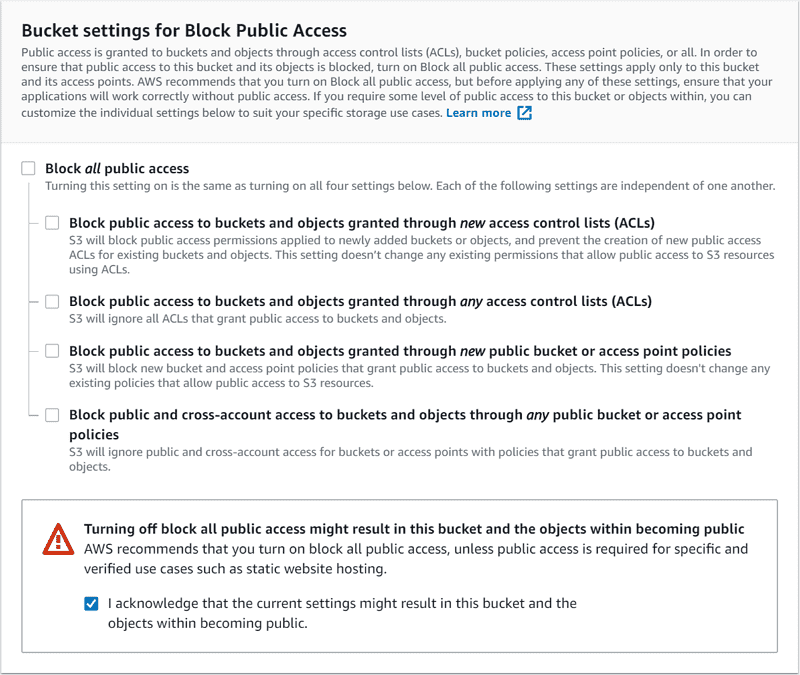
- Uncheck "Block all public access"
- Acknowledge the warning by checking the box
- Then click "Create bucket"
Step 2: Configure the bucket for static website hosting
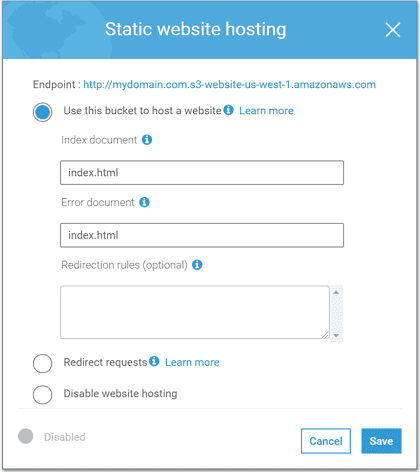
- Go to your newly created bucket and go to properties
- Click on Static website hosting
- Select "User this bucket to host a website
- Use "index.html" for both the Index and Error document.
Step 3: Attach new policy
Attach a new policy to the bucket that allows public access.
- Go to permisssions
- Select "Bucket policy"
-
Copy and paste the policy below to allow the public to read files from this bucket
{
"Version": "2012-10-17",
"Statement": [
    {
        "Sid": "PublicReadGetObject",
        "Effect": "Allow",
        "Principal": "*",
        "Action": "s3:GetObject",
        "Resource": "arn:aws:s3:::mydomain.com/*"
    }
]
}
At this point, you can host your Gatsby site by copying the contents of the "public" directory to this S3 bucket after you've run
npm run buildon your local machine. However, I'm sure you're reading this for the CI/CD part. Keep reading!
Step 4: Create new policy for new IAM user
Here, you are creating a new policy to use for a new user we will be creating in Step 5. The policy provides seeing what buckets are available as well as read and write permissions on the specified S3 bucket.
- Go to the IAM console and select "Policies" on the left navigation
- Click create policy
- Select the JSON tab
- Copy & paste the policy below
- Click "Review Policy"
- Name the policy
-
Click "Create policy"
{
"Version": "2012-10-17",
"Statement": [
    {
        "Sid": "VisualEditor0",
        "Effect": "Allow",
        "Action": [
            "s3:PutAccountPublicAccessBlock",
            "s3:GetAccountPublicAccessBlock",
            "s3:ListAllMyBuckets",
            "s3:HeadBucket"
        ],
        "Resource": "*"
    },
    {
        "Sid": "VisualEditor1",
        "Effect": "Allow",
        "Action": "s3:*",
        "Resource": [
            "arn:aws:s3:::mydomain.com/*",
            "arn:aws:s3:::mydomain.com"
        ]
    }
]
}
Step 6: Create IAM User
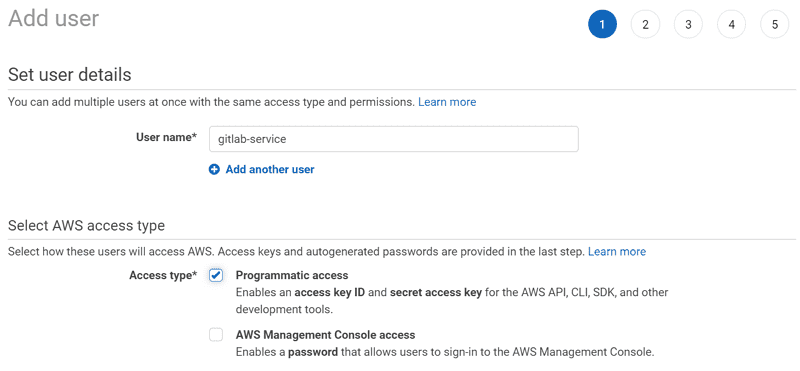
- Name the user
- Check "Programmatic Access"
- Click "Next: Permissions"
- Select "Attach existing policies directly"
- In the search box, type in the name of the policy you created above
- Click "Next: Tags"
- Click "Next: Review"
- Click "Create User"
- You will be brought to a page to get the Access Key ID and Secret Access Key. Don't close this window yet, you will need this for the next step.

GitLab
Step 1: Add CI/CD Variables
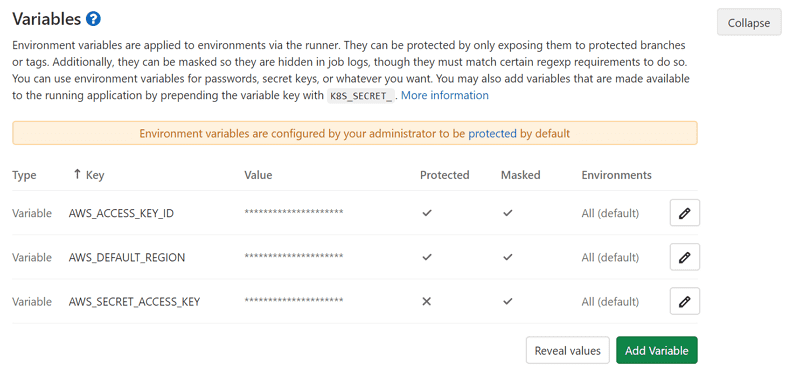
- Go to your repository in GitLab
- Select settings and CI/CD
- Expand the Variables section
- Add the key "AWS_ACCESS_KEY_ID" and "AWS_SECRET_ACCESS_KEY" and their values from the previous step
Step 2: Create and configure .gitlab-ci.yml
- Create a file called
.gitlab-ci.ymlat the root of your repository - Copy and past the following code
- Change the bucket name variable with yours
variables:
  BUCKET_NAME_PRODUCTION: mydomain.com

stages:
  - build
  - deploy

# This folder is cached between builds
# http://docs.gitlab.com/ce/ci/yaml/README.html#cache
cache:
  paths:
    - node_modules/

build-assets:
  image: node:latest
  stage: build
  artifacts:
    paths:
      - public/
  script:
    - npm install
    - npm run build

deploy-s3:
  stage: deploy
  image: python:3.8
  before_script:
    - pip3 install awscli --upgrade
  script:
    - aws s3 sync public s3://$BUCKET_NAME_PRODUCTION/ --delete
  environment: production
  only:
    - master
variables allows you to define values that you can use throughout your CICD configuration file. Here, we are specifying the bucket name
cache:
  paths:
    - node_modules/
We will be building our Gatsby site and we will need to grab all of our dependencies. This allows us to specify folders or files to cache in between runs
build-assets:
  image: node:latest
  stage: build
  artifacts:
    paths:
      - public/
  script:
    - npm install
    - npm run build
- We are specifying a job called
build-assets. This can be named anything you want. - We specify this job is part of the build
stage imagespecifies the docker image to use for the job. In this case, we are using thenode:latest. See https://hub.docker.com/_/node?tab=tagsartifactsare files and directories that are created by a job once it finishes. Here, we are specifying that we are creating a directory called "public"- The
scriptsection describes what scripts will run. These are the same scripts that you'd be running locally on your computer. - We are running
npm installto install all of our dependencies - When done, we run
npm run buildwhich Gatsby will generate the production version of our website. This will output to the "public" directory
Step 3: Commit and Push Code
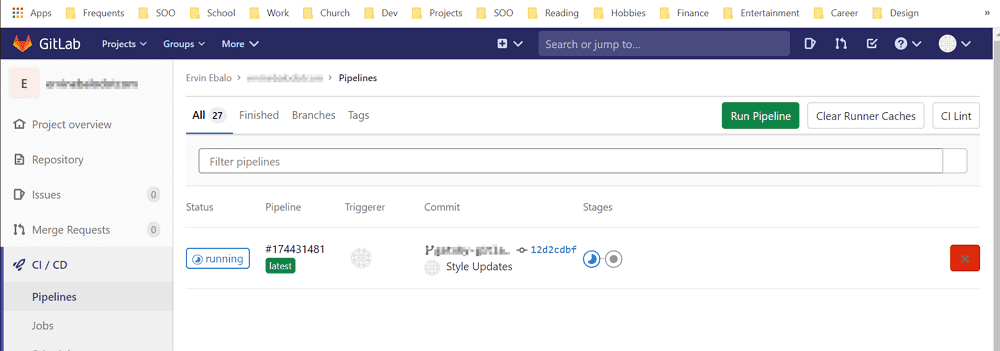
- Commit your changes and push to GitLab
- Go to your repository on GitLab and select CI/CD. If there were no issues with your
.gitlab-ci.ymlfile, you should see a pipeline active with two jobs

- Once the jobs are done, go to your S3 bucket and open the URL for your endpoint. Click on "Static website hosting" inside the Properties tab to get the URL.
Summary!
- We created an S3 bucket and configured it for static website hosting
- We created a user account that GitLab can use to put files into your S3 bucket, your GatsbyJS generated files.
- We created a GitLab CI/CD configuration file,
.gitlab-ci.yml, that generates GatsbyJS files from your code, then uploads it to your S3 bucket
Checkout the source code on GitLab
What's Next
Stay tuned for Part II where we use a custom domain for your website and setup a staging environment to test prior to going to production